Thursday, April 18, 2013

MongoDB installation on Windows

1. Download MongoDB .

2. Extract the downloaded zip to a directory say, 

 C:\mongodb-win32-x86_64-2.4.2
3. set path  ( C:\mongodb-win32-x86_64-2.4.2\bin ) in environment variable ( Optional )
4. Mongo requires a data directory to store its files . Default location is  C:\data\db.  Create these  folders.
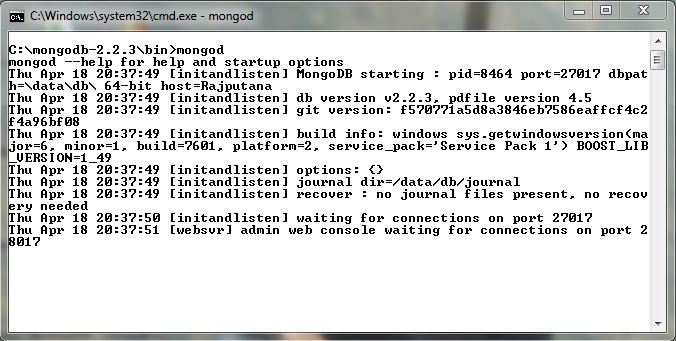
5. Start MongoDB in command prompt. mongod.exe is present in the bin directory of the distribution.


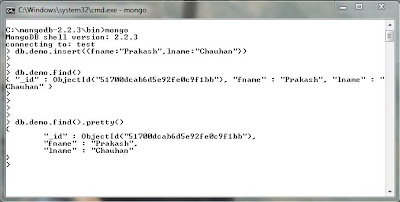
6.Connect to MongoDb using  Mongo shell in a new command prompt.


Now you can insert data in mongo db . Below is an example .


Wednesday, April 17, 2013

How to configure/integrate Weblogic8.1 in MyEclipse 5.5.1 GA

Integrating weblogic in MyEclipse is quite easy but before beginning you should be familiar with Weblogic
Server concepts and installation location details.


Properties :-


1)BEA Home Directory Path to BEA home directory. WebLogic consults this directory for its license and registry files. eg. C:\bea (considering that weblogic is installed in C:\ directory)

2)Weblogic installation directory Path to WebLogic Server installation directory. (eg. C:\bea\weblogic81)


3)Administration Username The name of the WebLogic system admin user.


4)AdministrationPassword The password of the WebLogic system admin user.


5)Execution Domain Root Directory that contains the execution domain directory.( eg. C:\bea\user_projects\mydomain)


6)Execution Domain Name The name of the WebLogic domain to execute under the root directory.( e.g. mydomain)


7)Execution Server Name The name of the WebLogic server that runs the domain. The server name is specified within the domain’s config.xml file. (eg. myserver)


8)Hostname:Number The hostname: portnumber of WebLogic server instance.(eg. localhost:7001)


9)Security Policy File The location of the security file used by WebLogic(eg. C:\bea\weblogic81\server\lib\weblogic.policy)


10)JAAS Login Configuration File This is not compulsary parameter It is required when the login configuration path is not specified in the security policy file or the user’s home directory for WLS 6.x.


Steps to integrate webogic8.1 :-1. Begin by clicking on the icon in the MyEclipse toolbar for configuring servers


2. Select the option "configure server"


3. select Application Servers -> Weblogic -> Weblogic 8.x

4. Fill all the required parameters as specified below. The parameters in this example are filled by considering that the weblogic server is installed in C:\ directory i.e the BEA Home directory is C:\bea


Steps to Configure JDK properties:-
The picture below defines the Java JDK preferences for an application server connector. The connector will use these parameters to determine the Java Virtual Machine and commandline arguments in the launch phase of an application server connector's life-cycle.


NOTE: The JDK Name value must identify a full Java JDK install. Do not specify a JRE. Doing so will result in launch failures of your server connector.


Steps to configure Launch properties:-Launch Mode defines if the mode in which the server connector will launch an instance. Debug mode enables uses of Eclipse/MyEclipse Java and JSP debugging capabilities such as breakpoints, inspectors, and hot-swap code changes. Run mode disables use of debugging features but offers better performance.


Steps for Configuring Paths:-There are three parameters to be provided and none of them is compulsary so you can leave them blank.

a)Prepend to classpath:-
Browse to and select the JAR and ZIP archives and the class directories you wish to have added to the beginning of the server connector JVM's classpath. Additions will be loaded by the Java VM before the web-server core classes.

b)Append to classpath:-
Browse to and select the JAR and ZIP archives and the class directories you wish to have added to the end of the server connector JVM's classpath. Additions will be loaded by the Java VM after the web-server core classes.

c)Append to library path:-
Browse to and select the platform-specific native libraries to be appended to the java.library.path.


So all the required configuration is done. Now just start the server and deploy your projects.

Done !!!

How to insert an image in Oracle through Servlet


Hi all,

In this post i will tell you how to insert image in a database (Oracle) through a Servlet.

First of all make a table in Oracle named "image_master" having three fields i.e id, name, image.

Step 1:- Creating table in database.
just copy / paste the code in oracle SQL command line:-
CREATE TABLE  "IMAGE_MASTER" 
   ( "ID" NUMBER NOT NULL ENABLE, 
 "NAME" VARCHAR2(40), 
 "IMAGE" BLOB, 
  CONSTRAINT "IMAGE_MASTER_PK" PRIMARY KEY ("ID") ENABLE
   )

Step 2:- Create a Servlet for inserting image.
Now after creating the table, make a servlet named "InsertImage" which extends HttpServlet and overrides doGet() and doPost() method.

package others;

import java.io.FileInputStream;
import java.io.IOException;
import java.sql.Connection;
import java.sql.DriverManager;
import java.sql.PreparedStatement;

import javax.servlet.ServletException;
import javax.servlet.http.HttpServlet;
import javax.servlet.http.HttpServletRequest;
import javax.servlet.http.HttpServletResponse;

public class InsertImage extends HttpServlet {
    private static final long serialVersionUID = 1L;

    @Override
    public void doGet(HttpServletRequest request, HttpServletResponse response) throws ServletException, IOException {
        try {
            /**
             * make a database connection. Here we are making connection with oracle database.
             * for Oracle Type-4 driver:-
             * Driver Class = ("oracle.jdbc.driver.OracleDriver")
             * Connection String = ("jdbc:oracle:thin:@localhost:1521:xe","user_name","password")
             */
            Class.forName("oracle.jdbc.driver.OracleDriver");
            Connection con = DriverManager.getConnection("jdbc:oracle:thin:@localhost:1521:xe", "system", "oralce");
            /**
             * making an object of FileInputStream for reading the image file in form of bytes.
             * path of the file is provided as an argument.
             */
            FileInputStream fis = new FileInputStream("c:/images/hello.jpg");
            PreparedStatement st = con.prepareStatement("insert into image_master values(?,?,?)");
            st.setInt(1, 1001);
            st.setString(2, "Prakash");
            /**
             * method setBinaryStream() is used for inserting image in database.
             */
            st.setBinaryStream(3, fis, fis.available());
        } catch (Exception e) {
            e.printStackTrace();
        }
    }

    @Override
    public void doPost(HttpServletRequest request, HttpServletResponse response) throws ServletException, IOException {
        doGet(request, response);
    }
}

Step 3:- Making web.xml entry:-
imageServlet 
servlets/ImageServlet

MongoDB introduction

MongoDB is a Non Relational JSON document store/database . Non relational means it does not supports relational algebra between the tables like SQL ( Does not support JOINs).

Benefits :

  • High performance.
  • High availability.
  • Highly  scalable.


MongoDB does not supports JOINs :
Joins scales poorly when we try to scale out to multiple nodes. 

No transaction support :
MongoDB doesn't provide any transaction support. Something that requires multiple updates within a relational system can be handled within a single atomic transaction within a single document in mongo.

Sunday, February 17, 2013

Dependency Injection ( DI )

Dependency Injection means inversion of responsibilities with regard to how an object obtains references to collaborating objects.

When applying DI , objects are given their dependencies at creation time by some external entity that coordinates with each object in the system.

Benefits : Loose coupling.

Friday, February 15, 2013

Define DDL , DML , TCL

Data Definition Language ( DDL ) :
Data Definition Language are used to define the structure of a database or schema.
Some of the example includes statements like CREATE , ALTER , DROP etc.
Oracle Database implicitly commits the current transaction before and after every DDL statement.

Examples :
  • CREATE - can be used to create a database , table , stored procedure.
  • ALTER - can be used to alter the structure of databse table like add a new column.
  • DROP - can be used to drop objects from database like drop a table.
  • TRUNCATE - remove all records from a table . also remove all spaces allocated for the recods.
  • COMMENT - can be used to add comments to data dictionary.
  • RENAME - renames an object

            Data Manipulation Language ( DML ) :
            Data Manipulation Language can be used to modify / alter the data of existing schema objects. 
            DML statements do not implicitly commit the current transactions.

            Example :
            • SELECT - used to retrive data from a database table.
            • INSERT - used to insert new record in a table.
            • UPDATE - can be used to update column values of a table.
            • DELETE - can be used to delete records from a table.
            • MERGE - insert or update operation.
            • EXPLAIN PLAN - explain access path to data.
            • CALL - can be used to call PL/SQL.
            • LOCK TABLE - controls the concurrency.

            Transaction Control Statements ( TCL ) :
            Transaction Control Statements are used to control the manipulations made by Data Manipulation Language ( DML ) statements . 

            Example :
            • COMMIT - used to commit the transaction so that any changes made by the query are reflected by the database table.
            • ROLLBACK - revert the changes that were made in the last commit.
            • SAVEPOINT -  creates / identifies a point in the transaction to which you can rollback later.
            • SET TRANSACTION - change transaction options like isolation level.

            Session Control Statements  :
            Session control statements dynamically manage the properties of a user session. These statements do not implicitly commit the current transaction.

            Example :
            • ALTER SESSION
            • SET ROLE


            Wednesday, February 13, 2013

            Immutable object in java


            Immutable objects are the  one whose state can't be changed once they are constructed. Example objects of class String and Integer. Immutable objects are considered useful in concurrent applications because threads can't change their state.


            How to create an immutable object ?

            1. Ensure that the class can't be overridden . The simplest way is to make the class final.   Another way is to make the construstor private and use factory methods to construct instances.


            2. Make all the fields private and final.


            3. Do not provide any methods that can change object's state . For example  don't provide any setter methods to change object's state.


            4. If the instance members refer to any mutable objects, don't allow those objects to get changed. This can be done in following ways :


            • Don't provide methods that can modify the mutable objects.
            • Don't share references to the mutable objects.
            • Never store references to external, mutable objects passed to the constructor. if necessary, create copies, and store references to the copies.
            • Never return the original mutable object in the methods, if necessary create copies of mutable objects and return them.

            Example 
            To demonstrate this behavior , we can take example of class java.lang.String


            String oldString = new String("Old String");

            System.out.println("Before : " + oldString);
            oldString.replace("Old", "new");
            System.out.println("After  : " + oldString);

            The output will be:

            Before : Old String
            After     : Old String

            Here we can see that the contents of the string oldString did not change. It is because the objects of class String are immutable.